"I have 300 battalions of 28mm Napoleonics if you'd like me to put on a game at your place". Just a little note added to my Christmas card 2023 from old friend Tony Dillon of Birmingham. Well, as regular followers of this blog will recall Tony is a good as his word from helping us in my little Cotswold haunt to stage Quatre Bras at 1:20 in 2016-17. Tony was also an award winner at Wild Geese Wargamers in 2022 and Cotswold Wargaming Day in 2023 with his Napoleonic skirmish game using his own invention - the "Napoker" rules. So this promised to be something special! Tony is a fan of Peter Gilder's "In The Grand Manner" school of massive historical refights with 36 figure "battalions" and 30 foot long tables so what could I offer with my mere 12 feet x 6 feet?
I've had quite a bit of experience being involved in large historical multi-player refights and hoped that I could help Tony bring his big ideas down to a scale we could manage and enjoy, yet still represent the whole of the strategically interesting battle of Lutzen. It took quite a lot of emailing and a meeting of minds to work out what made a sensible tabletop and then having the rest on a scaled map whereby we could represent the approach by both sides to the battlefield (as I've done before for Quatre Bras, Langelsalza and D'Erlon's Assault at Waterloo). That resulted in me making the map seen a little further below.
Two views of the second day give a glimpse of full-on Napoleonic wargaming -Lutzen 2024
 |
An aerial view of almost the full table length, near the start of our second day.
Allies on the left, French on the right |
 |
| Towards the end. Tony explains a point of the rules - 5 hits?!! |
Brief historical background to the battle
Why this map area?
Tony's game is designed for battalions and squadrons at about 1:25 scale with 16 inch musket range and artillery only limited to line of sight so I whittled him down to "battalions" representing regiments or small brigades and a figure:man scale of about 1:50. He agreed to a musket range of 10" and roundshot range of 48". I wanted to get the villages of Starsiedel and Eisdorf in at the extremes, and even then had to fudge the ground scale a bit. So we ended up with the scale seen on my map - 30" being roughly 1000 metres. I would have preferred shorter ranges, and it's worth noting that artillery on the line of hills at the southern edge can hit targets in Rows C and B. On reflection 36" would have been historically more accurate.
The Battle of Lutzen came about as a result of Napoleon's quick reformation of his Grande Armee following the distastrous Winter retreat from Russia of 1812-13. His army was in mid Germany and facing a fairly disorganised alliance of Prussia and Russia. The latter forces had come a long way from their home country and were fairly jaded by now. The armies were manoeuvring around Leipzig with most Allies to the South and most of the French to the West of that city. Wittgenstein and Blucher, leading Russians and Prussians respectively, were trying to bring most of their army over the Flossgraben watercourse to deploy onto the open plain South of Lutzen where their huge superiority of numbers in cavalry would begin to tell. Napoleon, on the other hand, was doing what he always tried to do - deploying his corps widely yet near enough to one another to coalesce into a formidable fighting force at the selected point - usually chosen once the enemy had committed itself.
Marshal Ney's III corps was on the southern flank, nearest the Allies and occupying the villages of Gross Gorschen and Starsiedel. Blucher struck them by surprise in late morning on 2nd May 1813, thinking it a mere brigade-sized outpost. Instead, the Divisions of Souham and Girard were strong enough to hold up the Allies till, one by one, extra Divisions arrived on or near our battlefield. Napoleon and Ney were about 12 miles away at Leipzig and could hear the cannon fire so wrote hasty orders to the various commands and rode off towards the battle. Without wishing to provide too many "spoilers", the Allied armies approached, fairly concentrated but slowly, and hampered by the Tsar (a dual role for me!) interfering with Wittgenstein's intentions; whereas the French corps and Imperial Guard were more dispersed, so approached from the North and both flanks. Historically French troops got onto our field of battle via the villages of Pobles, Eisdorf and Hohenlohe so it was necessary to include them to give both sides options - historical or otherwise.
 |
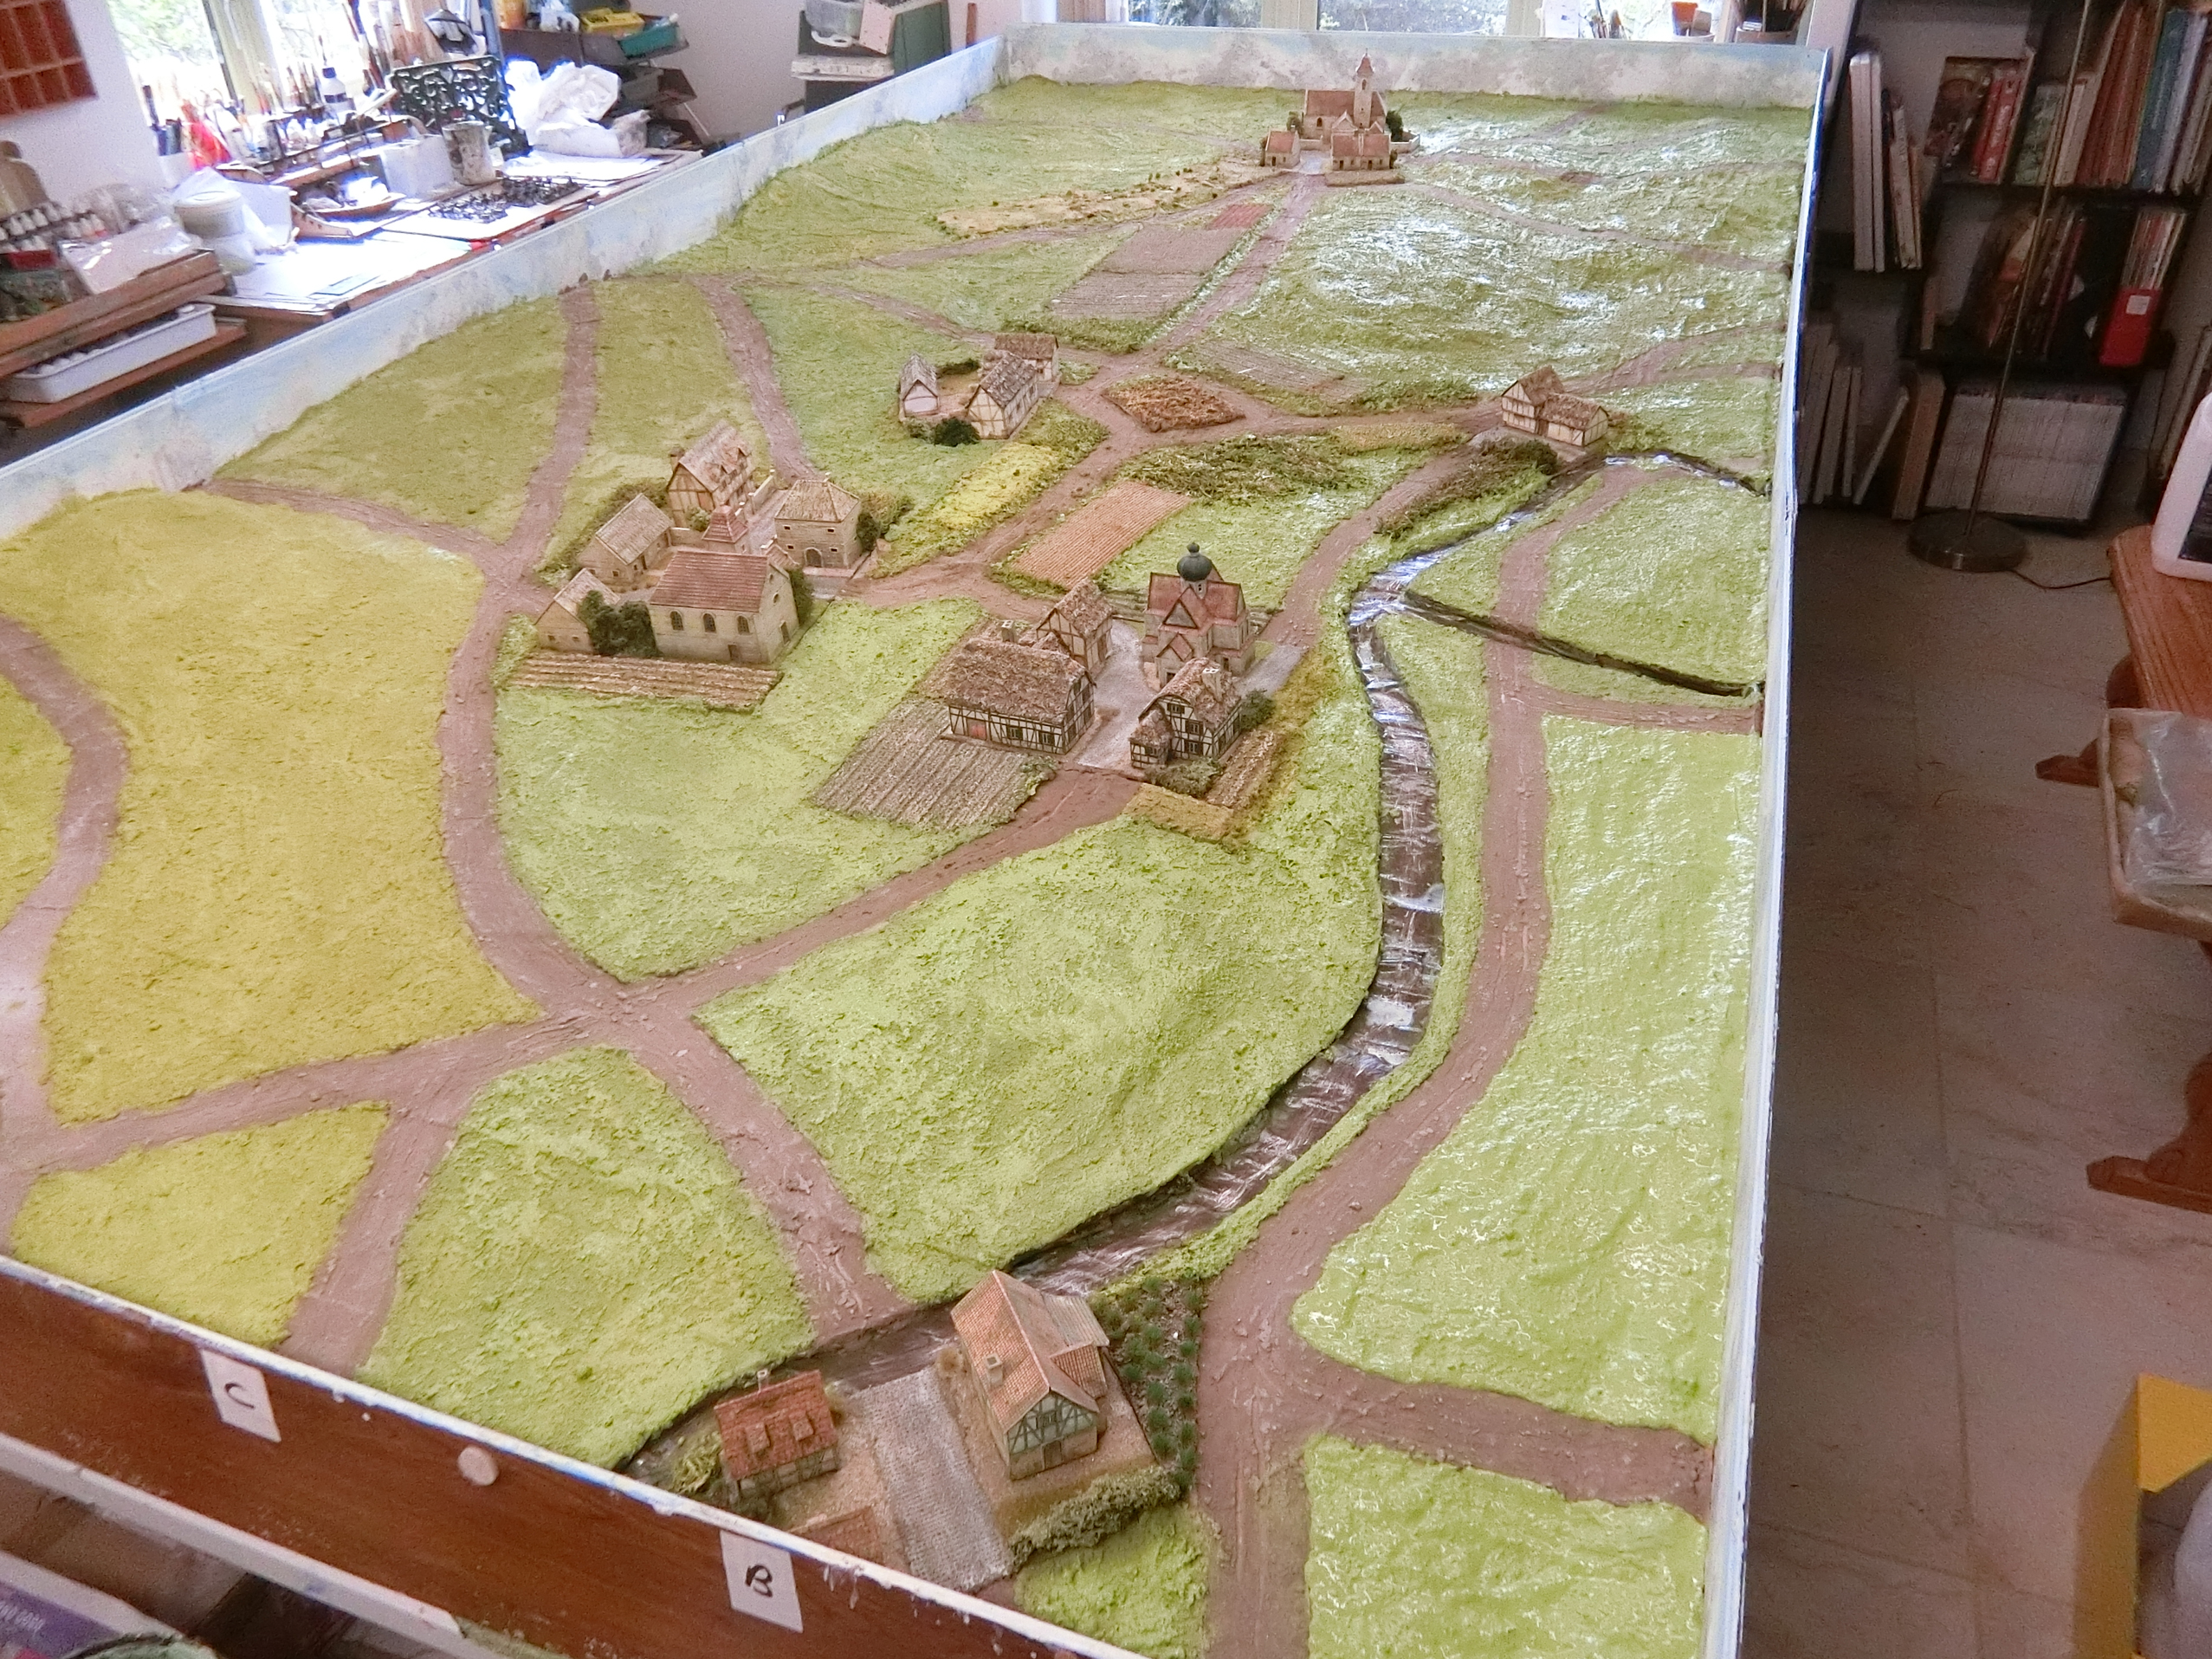
| My map of the overall battle area. The central area is the 12 feet x 6 feet wargames table |
Building the Battlefield
Present day views:
Gross Gorschen
My map is based on a 19th century one which shows contours and it is obvious that the whole area was not flat as it appears today. The "Monarchen Hugel" (F10/11 on my map) was said to be a significant high point but has been flattened for agriculture since.
Klein Gorschen and Rahna
Kaja and the Flossgraben bridge
Wonder if the cobbled street is 18th Century? I noticed more on the road from Kaja towards Lutzen. Anyway it gave me an excuse what to use in my models.
These photos bear out the 1813 view of the Flossgraben, which was that it was a former logging canal that had got overgrown with trees and bushes. The current bridge at Kaja is disappointing as it is just small, and plain concrete. However, that did reassure me that I did not need to make an elaborate model bridge!
We decided to allow cavalry and infantry to cross the Flossgraben with a lot of difficulty, but artillery could only cross where a bridge is shown on the map.
Starsiedel
To the North of Starsiedel and the shallow, muddy valley to Rahna, there was evidently a low ridge which the French used to good effect by multiple artillery batteries during the battle. I wanted to make sure my model represented these areas of high ground, even if they are not very high.
The map and these contemporary photos show the vilages have not changed much in size or character and are destined to be the most important and distinctive items on my model terrain.
 |
| Some illustrations from Osprey's "Lutzen and Bautzen 1813 - The Turning Point" which helped show the character of the buildings had not changed much |
Building the villages
Having established their look, character and size and that all were on flat land I thought it would make sense to make some paper templates of the tabletop villages and try out ideas for buildings. The only brief was there had to be enough free ground space to place model soldier bases either 45mm or 60mm wide, so I used 60mm as my road width almost everywhere and also left plenty of gardens and village squares free of too much texture. In addition a few of the larger buildings could take even 28mm figures.
I've put together a lot of photos of the whole process (minus final embellishments) for those really interested (see links below), but for brevity I just give highlights in this post for the general reader
Village buildings - process photos
Villages nearly finished
I reviewed all the photo references and also read that most buildings in 1813 had thatched roofs so I began to think about how to go about it. The size of buildings needed to be for 15mm/20mm figures so as to fit in better with 28mm figures in a representational game like this. Fortunately I already had bought over the last 2 years some 15mm 3D printed buildings, thinking they would be good for my 15mm Napoleonics, but they are far too big and I awaited an excuse to paint them for my 28mm SYW games. And here it came ......I had two sets of Aspern Church both came with a group of cottages, one lot had tiled roofs and the other thatch. These came from
Warfayre on Ebay. I've got a lot of their products, mostly in 10-12mm and thoroughly recommend them.
 |
| Full size 15mm Aspern church model with the set of tiled roof cottages and my original paper template for Starsiedel village. 28mm SYW figures on 45mm and 60mm bases for comparison |
 |
| This is Gross Gorschen village with thatched cottages and granary. I drastically cut down the 15mm church in length and tower height. I think it makes a terrific compact model now and not that different from the Google Streetview churches above. Another building is yet to fill the foreground space |
 |
| Above and below - spray painting grey undercoating, then black for emphasis and interiors. Mostly the roofs were sprayed separately with terra cotta and similar shades |
 |
| After more light spraying I've moved on to dry brush techniques with varying shades of brown and cream |
 |
| This photo shows Gross Gorschen buildings nearly finished and I have made a "big house" from one of many designs found on line as JPG or PDF and downloaded for printing to the required size on card. I painted the roof to match, more or less, the rather low-relief 3D printed thatch. |
 |
| From the templates I worked out I'd need just over 20 buildings of various sizes, so had a lot more to make from printed card. I reinforce them inside with balsa wood. The "thatched" card is intensely boring and bright yellow so I resolved to make my own. Here is a batch of gloop undercoat - mostly fine sawdust, plaster powder, PVA, acrylic or matt emulsion type paint and water. |
 |
| Rahna village thatch buildings in finished but still wet state, on a previously-loved and still textured building base. Don't let it dry completely yet, then you can use tools like toothpicks or an old toothbrush to coax it into some sort of orderly thatch roof look. |
 |
| When dry I use sandpaper or similar to smooth down the little nodules of hard sawdust to get a textured but basically even surface that takes dry brushing layers well. |
 |
| For variety I wanted to use a water mill and cottages from a PDF of Peter Dennis' excellent European Buildings set for use with his "Paper Boys" series (available online from Helion Books). I printed at 15mm size of course. They are beautifully drawn but I find the effect too soft and so I re-painted the tiles and outlined them and the timber framing with fine-liner pen (yeah, I'm mad I know!). This group was destined to be Eisdorf. |
 |
| I decided all the villages would have cobbled streets so as to distinguish the Built Up Area footprint from the main battle table once I had blended them in. I'm using a roll of plasterer's scrim. It's like thin plastic net on a 60mm wide roll (how handy!) but can be easily cut with scissors. It's sort of self adhesive but I found glue useful to keep at least the edges anchored. |
 |
| Got to admit this was an experiment - others may find a much better way to do this. I mixed a fairly thin and easily spreadable layer of fine gloop and tried to smooth it with a wide brush (this one is an old pastry glazer from the kitchen) to get the mesh to show slightly - it's likely to shrink tighter. |
 |
| It was drying a bit crumbly so another layer of mainly PVA and paint to fix it. This tool was a wall paper paste brush in a former life. |
 |
| Have to be patient to let the stages dry and then I went in with a thin black acrylic wash to make the cobbles stand out better |
 |
| When that was dry I tried all sorts of combinations of dry brushing, getting constantly lighter, to make the cobbles show up. Everyone's taste will differ on when to stop! |
 |
| No I haven't gone mad. The cobbles were completely dry and now I'm filling in all the spare areas with a light texture of sieved sawdust. That will mean I can leave some of it as paths and lanes and cover the rest with grass, tufts or whatever. All the surplus will shake off for recovery. |
 |
| See?...... |
The following sequence shows the villages "finished". But the most fun part is still to come when I incorporate them in the yet-to-be built terrain and add trees and bushes to help them blend in and look more welcoming.
 |
| Hob-e-Tac is really good for fixing foliage like adding scatter to model lichen to represent bushy trees at the side of buildings |
 |
| Just to entertain myself I put all the diverse villages together to connect by cobbled roads throughout. It would be great for a 1 to 1 scale skirmish with 15mm figures |
 |
| 28mm figures to show options, but these cottages at 15mm are too small for the figure height. The right hand template is for Klein Gorschen village. This Russian church from Warfayre 3D printing has a useful small footprint and I was pleased that it has a dome very similar to the photo above of Starsiedel church. |
Russian Church by Warfayre on Ebay
See how the villages ended up in the final section of this post
Building the tabletop terrain
As usual I stripped back to basics, so the first photos are of my normal textured 8 feet x 6 feet table but I've added the two spare pieces of 6 x 2 18mm MDF propped up on blocks to match the same height. This will all be covered up later.
 |
First I'm reusing and adding to past pieces of backdrop and coating
it all with a surface of white gesso to take the paint. These are
pieces of wooden laminated flooring that normally slot
together though of course I'm using them end-to end and cut to size |
.
 |
| Using acrylic paints, large brushes and speedy execution I just give a generic background of white and grey clouds against a very pale blue sky. Then cover a lot of it up with battlesmoke effects. Sponges and cloths and my hands are used to smudge and blend in wherever colours get a bit too dense. The idea is to give a background that won't "fight" the figures yet give a much nicer background to photographs than "wargamer's crotch"! (Older terrain boards can be seen underneath the palette) |
 |
When that is dry I fill the middle with as large pieces of cardboardas I can find.
I flatten and hoard them all year whenever we getsome big item delivered
(last year's Christmas reindeer light fitting boxes came in handy!)
Here I am just trying to create a roughly flat surface to build on
which protects whatever is underneath. |
 |
| To get my bearings the village templates are stuck down in the correct places and the Flossgraben marked (blue helps it stand out for this process, but see later) |
 |
| It begins to get exciting now as I can place the villages, and mark in the lowest contour and the high ground areas with brown acrylic paint. Now you can appreciate the scale as the distance from Starsiedel to Rahna is just over 4 feet. It's evident that not all the cardboard is actually flat but hopefully the later stages of sculpting will take care of that. Got to remember this is a temporary wargame model, not a museum piece. |
 |
| Closer view looking the other way |
 |
| Looking a bit absurd but, as always, I'm recycling saved bits from past terrains to help me build up the slight areas of rising ground this terrain demands. It will all be covered up. |
 |
| Lots of diluted PVA glue is used in the entire process. A 5 litre bottle is about £12 and I used about one and a half in all. This photo shows rolls of brown paper saved for the occasion from the filler from all those Amazon packages we all get....waste not, want not. |
 |
| It's a time consuming but satisfying job to cover the whole thing in at least two layers of brown paper (or newspaper but it's not as strong) papier mâché. In this photo I've cut out the Flossgraben in strips to make a recessed channel for it. |
 |
The strips are pared down by pulling the card layers apart till just the paper thin
blue bit is left and then that is stuck down at the new water level. |
 |
The Flossgarben will go through many layers of
PVA mixed with paint, and then gloss varnish.
Here is just a basic green foundation. On the dry
paper surface I've also indicated the roads
with marker pen and yellow ochre paint |
 |
| The roads are all coated with a gloop of fine sawdust, sand, paint, PVA and plaster powder. The river is now a more realistic, muddy green-brown |
 |
| Before this stage I had surrounded all the villages with recycled-from-former-games friendly looking ploughed fields and veggie patches, or common land and heath. Only then could I work out what to do about all the in-between areas and the large open hill slopes. |
 |
| Above and below: The answer was to mix various shades of gloop with mostly sawdust and PVA and majoring on various coloured greens of tins of household matt emulsion. I was not too fussy as it would all be blended as it dried. |
 |
| All now covered in some texture and it is an ongoing, fun process to keep getting constantly lighter dry brush shades from the greens mixed with yellows, and creams and white until I'm satisfied. It's softer under the normal lighting than most photography suggests. Still some way to go from this photo |
 |
| Above and below: Treating the roads to a dark brown so that later highlighting will show up the ruts made with coffee stirrer sticks when the plaster gloop was drying |
 |
| Beginning to dry brush the roads. White marks in the Flossgraben are puddles of clear gloss acrylic varnish drying out |
 |
| More coats taking the roads to completion. The higher ground has been dry brushed much lighter to help the players realise when the contours take effect. |
 |
| This photo shows that along the way I was "weathering" the standard downloadable card model house surfaces with shading, wear and tear, dry rot etc to make them look as if they are really part of the landscape |
 |
| Terrain pretty much finished now. Small trees and bushes placed around the villages, and significant foliage in the form of trees and hedges make the Flossgraben a daunting proposition to try to cross, though artillery and muskets can still fire across it. Eisdorf bridge has yet to arrive. |
Finished battlefield
The players got treated to an online "tour' of the finished battlefield to help their planning, here are some of the highlights with a small sample of my 18th Century figures to give them an idea of unit sizes for the game.
 |
Above and below: Two views of the embellished Peter Dennis mill and cottages useful for my Eisdorf.
The bridge is old pieces of cut down Britains plastic farm walling (1:32 scale) either side of reinforced plasticard cobbled street. |
 |
| Klein Gorschen |
 |
| Gross Gorschen. Lichen bunches on wooden sticks for tree trunks covered with scatter for leaves make an effective boundary for the side where there is no road |
 |
| Rahna with Kaja in the distance |
 |
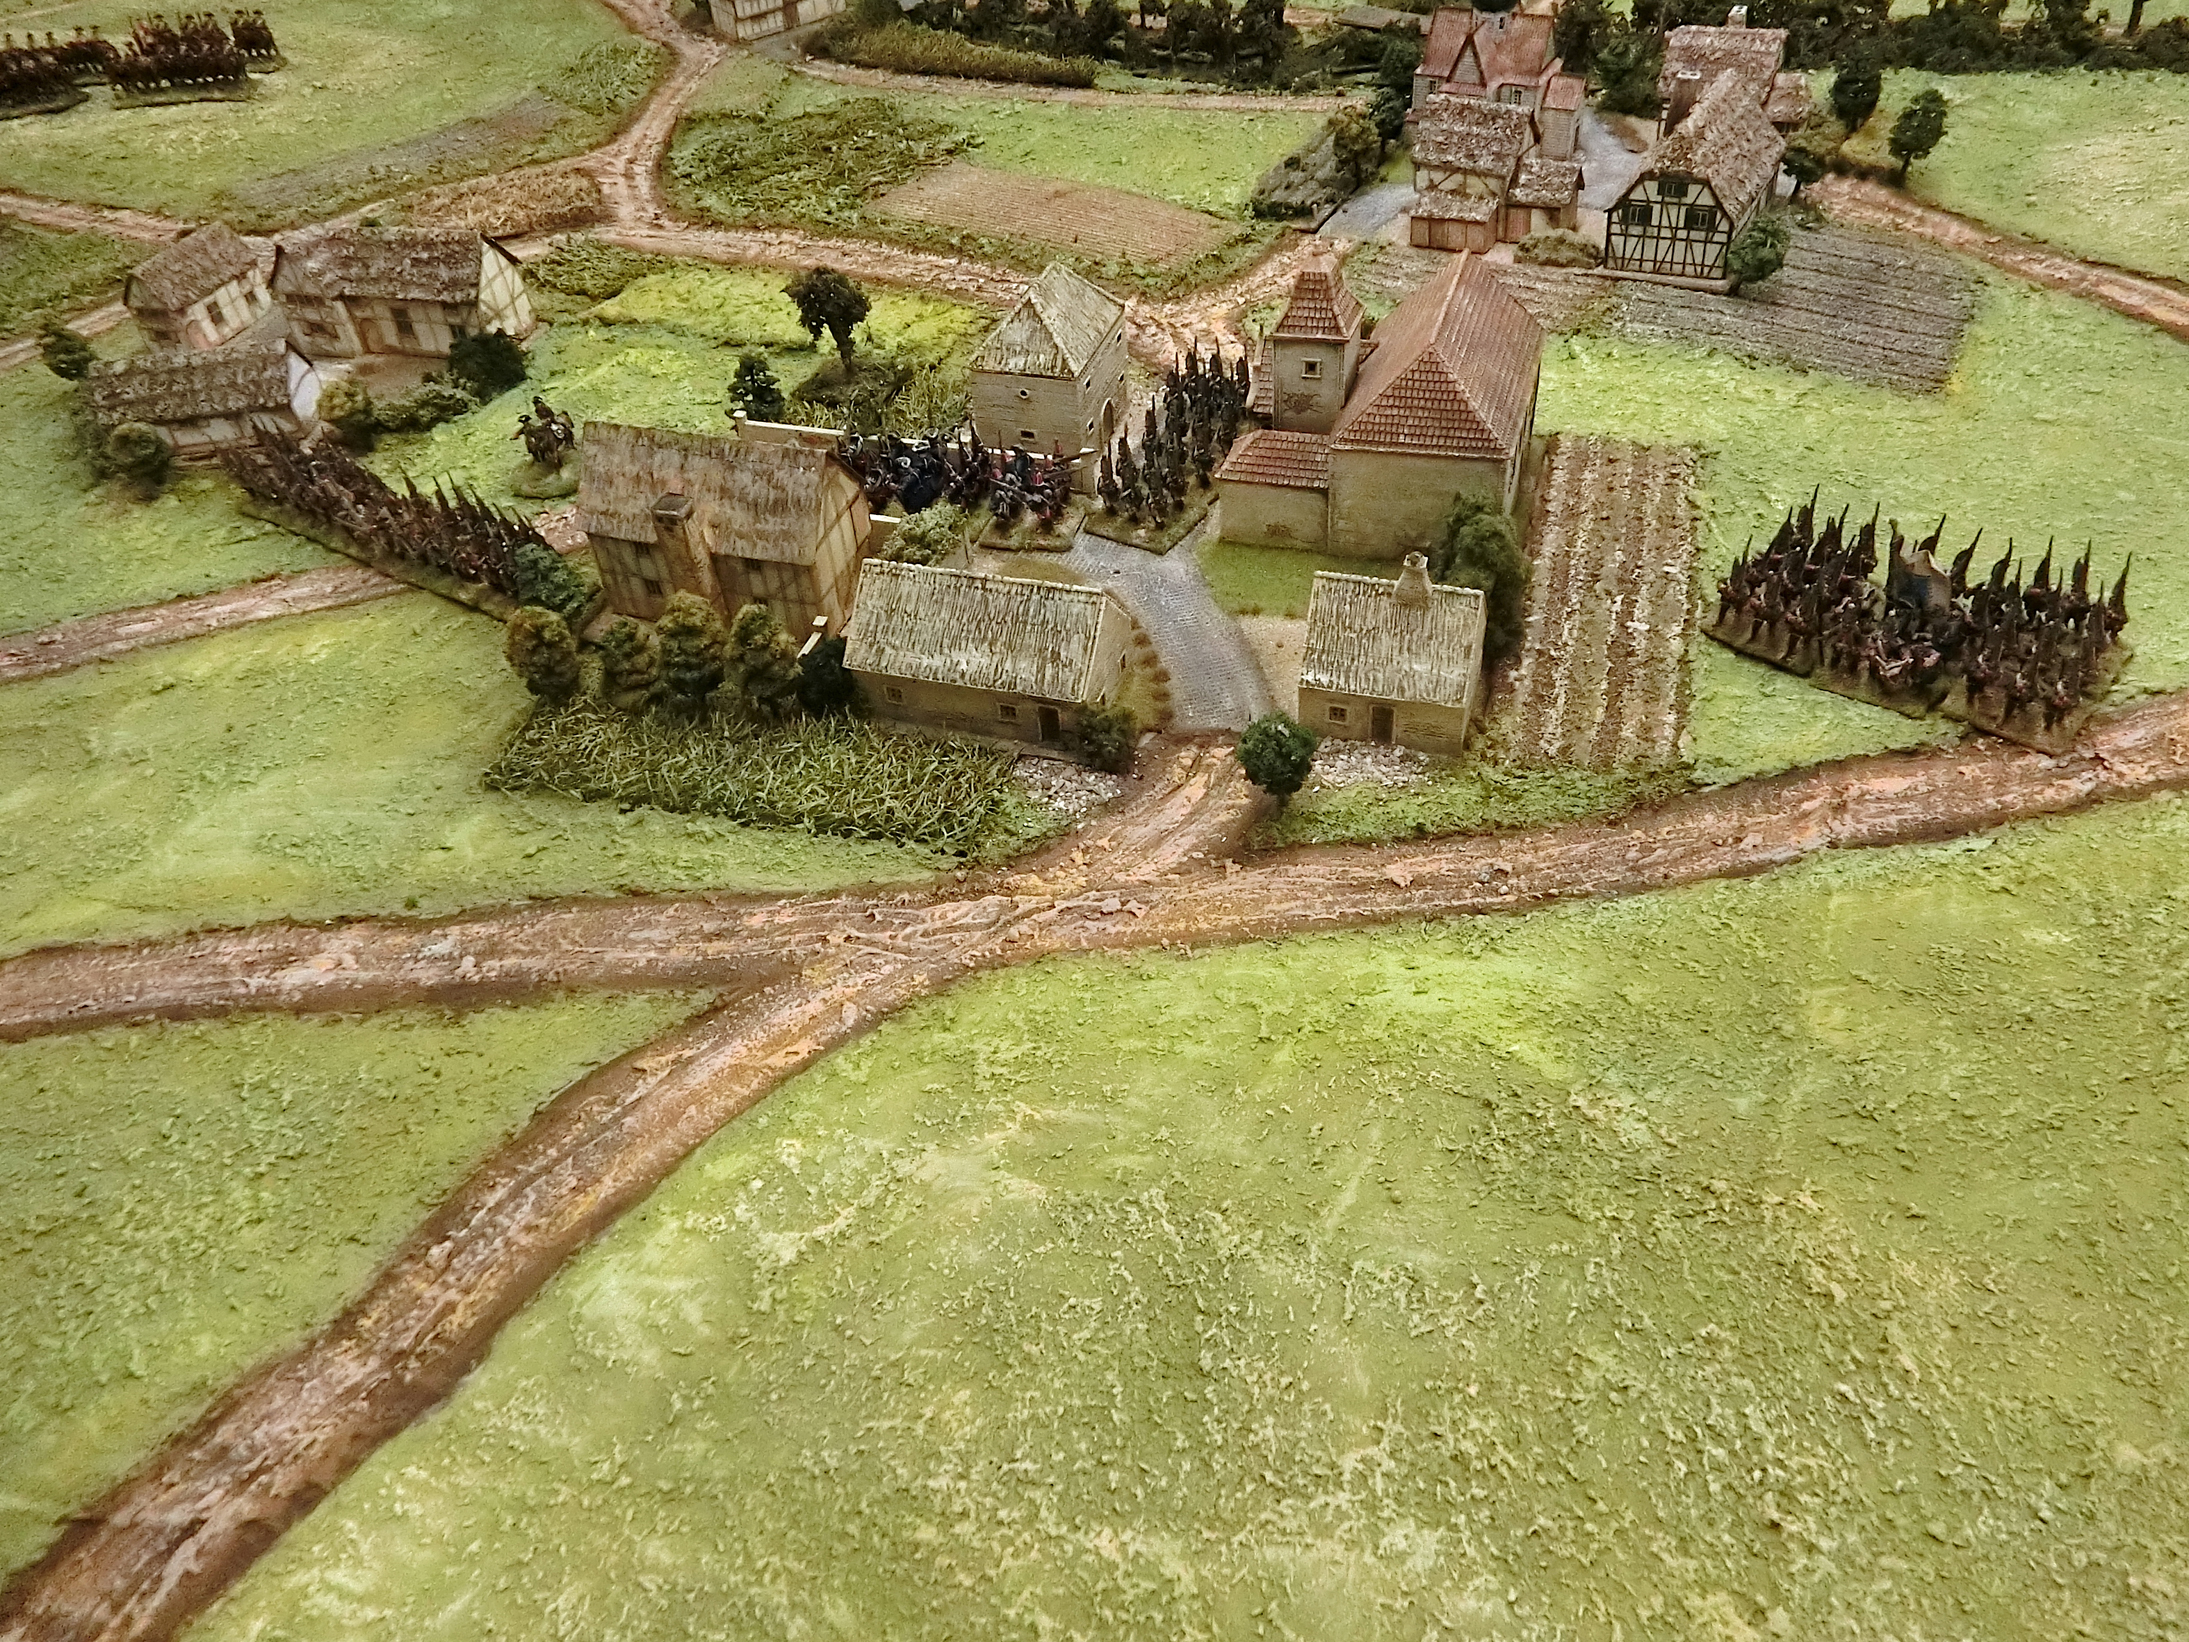
| The central danger zone between the three main villages |
 |
| Starsiedel. Probably marginally the biggest village on the table. Tony decided it could hold 48 figures, as could Gross Gorschen |
 |
| Above and below: there was apparently a thick wood between Klein Gorschen and the Flossgraben defended by Prussian infantry at one point, so I thickened the patch of foliage for the actual game and it proved an interesting obstacle and defensive feature |
 |
| Kaja the smallest village, and its footprint includes the road and small hedge-bounded field. I opted for flat plank bridges for practicality of transporting big 60mm figure bases through a tiny defile. Five coats of gloss varnish have made the watercourse quite convincing in my opinion. |
 |
| Three SYW "battalions" garrison the Gross Gorschen and Rahna area |
 |
| Infantry and artillery in the fields and higher ground beyond |
I hope that has given an enjoyable introduction to this major project. Please comment or ask questions if you wish. I'll leave this post with a taster of the opening positions for Lutzen and lots more on that in the next post - next week.
 |
| Overall view, Prussians on the high ground (Monarchen Hugel), French in the villages |
 |
| Girard's Division garrisons Starsiedel but is marching men towards Rahna |
 |
| Kellermann's cavalry brigade near Kaja |
 |
The French artillery are watering horses and refitting equipment down
by the Flossgraben |
 |
| Blucher's Prussian infantry look down on Gross Gorschen....... |
 |
| .....and the guns are about to open fire |
 |
| Souham's Division is spread out between Gross and Klein Gorschen |